Showing posts with label recipe. Show all posts

Sunday, August 14, 2011

Lasagne Cupcakes


"Holy smokes, batman!" says all twelve of you, "Two posts in one day?!"

I've been meaning to make this post for a while now, but these things are impossible to get nice looking photos of. They inevitably look like... cheese blobs. What they are, is pure brilliance! (I'm allowed to say that because it wasn't my idea!)

Using the No 1 Best Lasagne Recipe (they really aren't kidding), instead of layering it in a lasagna dish, I layered it in a muffin tray. For the pasta, I used home-made pasta (Flour, Salt, Eggs) and pressed out little circles with a cookie cutter. You want to cut your circles that are about the size of the TOP of the muffin trays, allowing it to fold up the sides, thus keeping your layers together.

As for the layering, I didn't follow the exact layering, I just add stuff as I feel like it. I used about three pasta circles for each "cupcake".

The nice thing about it is, if you have picky dinner guests, you can make three different fillings (beef, chicken, vegetarian) and just layer it differently for each guest!

Saturday, June 26, 2010

White Sandwich Bread

Bread. As more of a "cake" type person, bread is something I've always wanted to try but have only ever attempted once, with sadly disastrous results. If I recall correctly it tasted both completely tasteless and strongly of yeast, at the same time. A feat, I'm sure.

However, a few years have passed and I have recovered enough from my abject failure to attempt it once more.

After long and arduous research, I came across a recipe that appeared to have merit, namely:
Susan's Easy Basic White Sandwich Bread Recipe

White Sandwich Bread

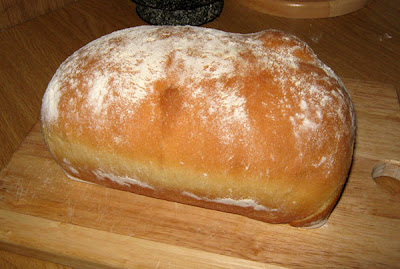
It ended up making a really delicious white bread. It's denser than store bought bread and more filling (and will probably not keep as long, due to a lack of preservatives) but also really, really good.

I cut the recipe in three, halved the yeast, couldn't find any bread flour and didn't have any Canola oil so here's how I did it.

Ingredients:
3 1/3 cups (825ml) Flour
1 tsp (5ml) Instant Yeast
2 tsp (10ml) Sugar
2 tsp (10ml) Butter / Margarine
1 1/3 cups (325ml) Milk
1/2 tbsp (7.5ml) Salt

  1. Mix 1 1/3 cups (325ml) of flour, the yeast and the sugar together.
  2. Heat the milk and butter / margarine until the butter melts and then let it cool until only slightly warm.
  3. Make a hole in the flour mixture and pour the buttermilk into it, mixing vigourously. (Yay for lumps)
  4. Now gradually add the rest of the flour, mixing as you go. It should stop sticking to your fingers by the time you're done.
  5. Knead the dough for about 6 to 7 minutes. (My poor weak arms :( )
  6. Cover the dough and rest your arms for 20 minutes (while the dough autolyses or something)
  7. Now flatten the dough, sprinkle half the salt on it. Fold it a few times, flatten again and sprinkle the rest of the salt on it.
  8. Back to kneading! Take your frustrations out on it for another 5 to 7 minutes.
  9. Put back in the bowl, sprinkle some flour on it, cover and put in a warmish place (about 21ºC apparently). Now take a well earned rest until the dough has doubled in size (about an hour and a half).


  10. Don't worry sprout, soon you will grow big!


    Almost there!

  11. Remove the dough from the bowl and flatten it (I've been told to be gentle with the dough at this stage, I failed). Now you can either roll it up and fold the sides in, making a nice roll, or you can follow a more complicated route, detailed here.
  12. Place your roll in a bread pan (seam side down) and sprinkle with flour, like so:


  13. Cover with a damp cloth and leave to rise until it's once again doubled it's size, took about another hour and a half.


  14. Bake in a 190ºC oven for 35 minutes.


  15. Yes, I know it has bubbles. :/

  16. Turn out on a baking tray (I don't own one of these) and let it cool down for about 40 minutes before cutting (yeah right).


Yum!

Monday, July 6, 2009

Marble Butter Cupcakes


So we come to the reason for this blog's existence and as you may have guessed from the name... it is cupcakes. Specific cupcakes.

The other Sunday the baking bug bit me again and I decided on cupcakes. I had used my gran's secret recipe prior, which is similar to "Angel food cake" I think, in that it's made mostly by beating the hell out of some eggs and then adding a whiff of other ingredients. This time I felt like something more substantial (and less complicated) and decided to try the Butter Cake recipe in my ancient "Kook en Geniet".

They came out pure awesomeness, if I do say myself.

Butter Cake
125g Butter/Margerine
375ml Sugar
5ml Vanilla Essence
3 Eggs
625ml Flour
20ml Baking Powder
2.5ml Salt
200ml Milk

  1. Beat the butter and gradually add the sugar. Beat until light and creamy. Add the vanilla essence.
  2. Add the eggs one for one and beat very well after each addition.
  3. Sift the flour, salt and baking powder together and gradually add it and the milk to the butter mixture, alternating between the two. Beat until everything's mixed well and it has a velvety appearance (hey, that's what the book says). Don't stir, beat, cause you're trying to get air in, not out.
  4. Fill cupcake cups to about... half to two thirds full.
  5. Bake for 15-20 min at 180C (350F). If you stick a toothpick into one, it should come out clean.


I however, decided to get a bit creative and before putting them into the oven, I swirled some food colouring into each with a toothpick. While this looked absolutely awesome when they came out, unfortunately the colouring doesn't go deep enough into the batter (or I didn't get it deep enough anyway). This meant that the marble effect was mostly covered by the icing.


For the icing I simply beat some butter and then gradually added icing sugar until it tasted like I wanted it to.

They were meant to be blue and pink, however, the local supermarket was inconsiderate enough not to have blue food colouring (the nerve!).

On a final note, I'll definitely use this recipe again. The only downside I can see to it is the extreme detriment it could have to one's weight.