
Friday, August 17, 2012
A bowl full of lemons.: Home organization 101...
A bowl full of lemons.: Home organization 101...: The kids are in school and the house is a mess! Sound familiar? Its been almost 2 years since I created my 21 day challenge , so I w...

Sunday, July 29, 2012
I made a top!

Let me start off by saying I am not a seamstress by any measure. My entire history of sewing consists of a variety of Barbie clothes, a tissue box cover in the Junior School and an apron. So saying I'm pretty damn chuffed with myself is an understatement.
I started off with the overgarment drafting tutorial by BurdaStyle with the intention of making a hoodie. Fearing the worst, I decided to "try it out" on some R15/m (about...1.2 pounds per metre) fabric I had lying around. Unfortunately said fabric turned out to be stretchy (or knit, as I know now), which complicated matters.
After basting it together (yay I knew my Gr.7 needlework skills would be up to good use), I started... modifying, as I ALWAYS do. Luckily in this case it all worked out in the end.
I did however cut the fabric of the body wrong, so the stretch goes vertical instead of horizontal, the colour is unfortunately similar to that of jeans and I'm still contemplating whether to add embroidery somewhere to it or not.


Friday, April 13, 2012
Project Run and Play: Time to Vote! Week #1--Circle Skirt Pattern Remix...
Yes! I managed to catch the start of Run and Play this season.
Project Run and Play: Time to Vote! Week #1--Circle Skirt Pattern Remix...: It's time to vote!!!!! There are 8 contestants so make sure you scroll all the way down to see all of their designs. The poll is in the l...
Project Run and Play: Time to Vote! Week #1--Circle Skirt Pattern Remix...: It's time to vote!!!!! There are 8 contestants so make sure you scroll all the way down to see all of their designs. The poll is in the l...
Sunday, April 1, 2012
Shabby Chic Cabinet

[Forgive the quality of the photos, my computer crashed and this one only has Paint.]
So my husband and I recently moved house (again), hopefully for the last time in a looong while. For the first time we're not renting, so I can actually DO something to the place.
I'll be adding some photos on here as we make changes, but first up, something small!
A while ago we bought a set of bedside tables from a second-hand shop with the intention of repainting them to match my room. Sadly I never got around to it and by now I had already decided that I dislike their shape as well as their colour.

I eventually found perfect ones to replace them and decided to redo one of them as a bathroom cabinet.
First, I sanded the whole thing down. I didn't try remove the paint except on the corners.
Then I painted the whole thing with a light grey paint that I had a sample of (for my waaalls!)
After that dried I sanded it down lately. Then I diluted some white wall paint about 50/50 and painted over the grey. With both the grey and the white I tried to keep my brush strokes in the same direction, in an attempt to fake some wood grain.
After the white had dried a -little- a took a cloth and wiped it off, in areas where the paint was still too wet (and thus wiped off completely) I just repainted and waited.
I decided to varnish the end product, even though the paint I used didn't really need it. I wouldn't do it again, the varnish was horrible to work with (being non-water based) and it added a brownish tint to the corners.
Here's the end product:


Sunday, August 14, 2011
Lasagne Cupcakes

"Holy smokes, batman!" says all twelve of you, "Two posts in one day?!"
I've been meaning to make this post for a while now, but these things are impossible to get nice looking photos of. They inevitably look like... cheese blobs. What they are, is pure brilliance! (I'm allowed to say that because it wasn't my idea!)
Using the No 1 Best Lasagne Recipe (they really aren't kidding), instead of layering it in a lasagna dish, I layered it in a muffin tray. For the pasta, I used home-made pasta (Flour, Salt, Eggs) and pressed out little circles with a cookie cutter. You want to cut your circles that are about the size of the TOP of the muffin trays, allowing it to fold up the sides, thus keeping your layers together.
As for the layering, I didn't follow the exact layering, I just add stuff as I feel like it. I used about three pasta circles for each "cupcake".
The nice thing about it is, if you have picky dinner guests, you can make three different fillings (beef, chicken, vegetarian) and just layer it differently for each guest!

Cupcake Swap!

So I entered a Cupcake Swap on my favourite site, Crafster. The aim of the game is, you get given a swap partner and the both you craft cupcake-themed items and mail it to one another.
Completely by chance, Urban Threads happened to have a special on cupcake themed embroidery patterns, AT THE EXACT SAME TIME! Coincidence?! ...probably.

After splashing out horrendously I decided that I was going to make an apron. Mostly because I know how to make aprons. I also decided to make a matching dishcloth and due to the fact that half of my baking episodes consist of going "where the hell is the dishcloth", I decided to velcro the dishcloth to the apron.
As you can see from the top image, I also added a cupcake pincushion (which my husband says looks more "muffin-like" and little cupcake notebook (which I didn't make).
Surprisingly our postal service even managed to get it all the way to Canada!

Sunday, July 31, 2011
Soap.. at last I have attempted it!

So after perving (almost literally) over the wonderful soaps I've seen the people on Crafster make for months, I've at last tried my hand at it. Now before you get excited, it's only Melt-and-Pour soap, I'm still girding my loins for lye (and searching for lard).
The first step was of course trying to get my hands on supplies. Which is pretty much the first step of ANY craft in South Africa, other than scrapbooking. Eventually after much searching, I found a South African site (Fun With Soap) that sold the stuff. Yay! I ordered my box of supplies and a couple of weeks later (thank you SA Postal) my box arrived, though it looked like someone had kicked it around a bit, it'd come open and a bunch of the stuff inside had leaked (thank you SA Postal, again).
The first soap is a Brown Sugar and Vanilla Soap (with added Vitamin E).

The second soap is a Lavender and Olive Oil Soap. The flowers were supposed to be suspended, not floating on top, but oh well.

Now I just have to find people to test.. I mean gift them to.
Tuesday, December 21, 2010
First Pottery Pieces
So I recently started doing pottery on a weekly basis. It's super fun, except for the part where I have to keep my nails short :(
The title is technically a lie. My -first- pottery pieces were a coiled cereal bowl, which sadly cracked in the kiln and consequently can now only serve as a peanut bowl that looks like it was made a five year old. And then of course, the famous, Ugliest Sugar Bowl IN THE WORLD. It's a pinch pot... but yes, not exactly something I want to show off.
Right, so moving on.
The teacup below was my first thrown object, the saucer my second. As you can see from the size of the saucer, I got a very quick lesson in "clay shrinks". They're made from terracotta earthenware, the inside is glazed in black and outside in... something shiny.
Unfortunately the kiln apparently hates me and decided to drop some fluffy insulation stuff on my cup while it glazing, causing the bubbling etc you can see on the photos.
Teacup:

Saucer:

Saucer Bottom:

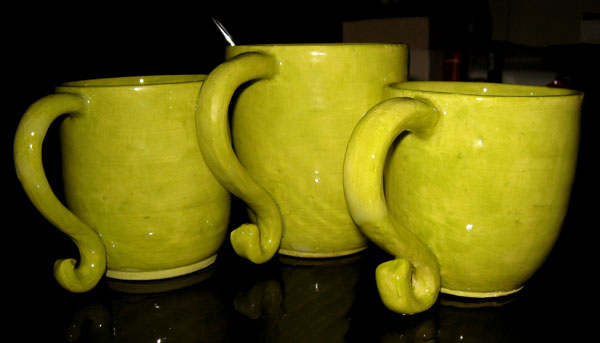
And then this is my latest attempt.
Contrary to what you may believe, these are a set. See? They're the same colour. And yes, I did weigh the clay before I made them. Somehow I still managed to make three completely dissimilar mugs. Oh well.

The title is technically a lie. My -first- pottery pieces were a coiled cereal bowl, which sadly cracked in the kiln and consequently can now only serve as a peanut bowl that looks like it was made a five year old. And then of course, the famous, Ugliest Sugar Bowl IN THE WORLD. It's a pinch pot... but yes, not exactly something I want to show off.
Right, so moving on.
The teacup below was my first thrown object, the saucer my second. As you can see from the size of the saucer, I got a very quick lesson in "clay shrinks". They're made from terracotta earthenware, the inside is glazed in black and outside in... something shiny.
Unfortunately the kiln apparently hates me and decided to drop some fluffy insulation stuff on my cup while it glazing, causing the bubbling etc you can see on the photos.
Teacup:

Saucer:

Saucer Bottom:

And then this is my latest attempt.
Contrary to what you may believe, these are a set. See? They're the same colour. And yes, I did weigh the clay before I made them. Somehow I still managed to make three completely dissimilar mugs. Oh well.
Wednesday, December 15, 2010
To Do List
I've currently got so many projects up in the air that I'm not actually getting to any of them. So I figure I'd put them here where I can't lose the list.
So as it stands as of today:
So as it stands as of today:
- Complete the apron and chef hat (to be done before Christmas)
Shhh, secret. - Complete all my Christmas stockings (to be done before Christmas)
They're not really "stockings" per se. I'd originally planned to buy lots of little presents, but that ended up too expensive and if you don't have lots of little presents in the stocking then the "toe" part becomes a bit awkward. Thus they're more like pseudo stocking bags. - Finish knitting the Branching Out Scarf by Susan Pierce Lawrence for a Craftster Challenge (to be done before 7th of Jan, haha)
Well this is turning out to be a frustrating project. It's not that the lacing is hard, it's just that if you drop a stitch, you're pretty much screwed and have to start over. - Finish the last cupcake pincushion.
I'm still trying to figure out a way to get the "cup" right. - Complete my apron, to replace the one ruined by the maid.
She washed my white hand made apron with my jeans :( - Complete my Lickle Bear cross-stitch. (Almost done!)
I really shouldn't admit outloud that this isn't finished yet. - Make a knitting bag.
I've bought the ingredients for this, but I'm planning on using my cross-stitch to make the bag, so I need to finish that first. - Make a new duvet cover and pillow covers and redecorate my bedroom.
A bit tired of my room, thought about redoing it in white and lime with black embroidered cat designs on it. Also swirls... it'll look more awesome than it sounds, promise. - Make inchies!
I just saw them on Craftster they look like so much fun! - Finish knitting the sweater.
Possibly three years from now. - Learn to make soap!
On condition I find the ingredients to do this with.


Saturday, August 28, 2010
Cupcake Pincushion

After seeing the adorable Cupcake Pincushions by Kylie my immediate reaction was, "I want one."
Carefully following her directions, I came to the conclusion that my city sucks when it comes to craft supplies and consequently a lot of deviation and improvisation was required.
Firstly, the only styrofoam balls I could find were either too big or too small, so eventually I went and bought some sponges, like old school bath sponges, the flat cylindrical ones and just sewed the ends in until it formed a ball.
Then I couldn't find a cup that was the right size and eventually I constructed one from cardboard. According to my boyfriend, this cardboard cup was the most homemade thing he'd ever seen (and he didn't mean it as a compliment).
In the end however, it came out better than I expected. For my next one, I'll make the cup diameter smaller and I'll make my first icing wobble a bit bigger, but overall I'm quite happy with it.
Saturday, June 26, 2010
White Sandwich Bread
Bread. As more of a "cake" type person, bread is something I've always wanted to try but have only ever attempted once, with sadly disastrous results. If I recall correctly it tasted both completely tasteless and strongly of yeast, at the same time. A feat, I'm sure.
However, a few years have passed and I have recovered enough from my abject failure to attempt it once more.
After long and arduous research, I came across a recipe that appeared to have merit, namely:
Susan's Easy Basic White Sandwich Bread Recipe
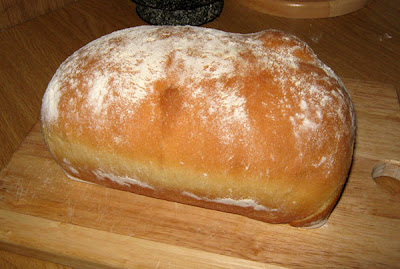
It ended up making a really delicious white bread. It's denser than store bought bread and more filling (and will probably not keep as long, due to a lack of preservatives) but also really, really good.
I cut the recipe in three, halved the yeast, couldn't find any bread flour and didn't have any Canola oil so here's how I did it.
Ingredients:
3 1/3 cups (825ml) Flour
1 tsp (5ml) Instant Yeast
2 tsp (10ml) Sugar
2 tsp (10ml) Butter / Margarine
1 1/3 cups (325ml) Milk
1/2 tbsp (7.5ml) Salt

Yum!
However, a few years have passed and I have recovered enough from my abject failure to attempt it once more.
After long and arduous research, I came across a recipe that appeared to have merit, namely:
Susan's Easy Basic White Sandwich Bread Recipe

It ended up making a really delicious white bread. It's denser than store bought bread and more filling (and will probably not keep as long, due to a lack of preservatives) but also really, really good.
I cut the recipe in three, halved the yeast, couldn't find any bread flour and didn't have any Canola oil so here's how I did it.
Ingredients:
3 1/3 cups (825ml) Flour
1 tsp (5ml) Instant Yeast
2 tsp (10ml) Sugar
2 tsp (10ml) Butter / Margarine
1 1/3 cups (325ml) Milk
1/2 tbsp (7.5ml) Salt
- Mix 1 1/3 cups (325ml) of flour, the yeast and the sugar together.
- Heat the milk and butter / margarine until the butter melts and then let it cool until only slightly warm.
- Make a hole in the flour mixture and pour the buttermilk into it, mixing vigourously. (Yay for lumps)
- Now gradually add the rest of the flour, mixing as you go. It should stop sticking to your fingers by the time you're done.
- Knead the dough for about 6 to 7 minutes. (My poor weak arms :( )
- Cover the dough and rest your arms for 20 minutes (while the dough autolyses or something)
- Now flatten the dough, sprinkle half the salt on it. Fold it a few times, flatten again and sprinkle the rest of the salt on it.
- Back to kneading! Take your frustrations out on it for another 5 to 7 minutes.
- Put back in the bowl, sprinkle some flour on it, cover and put in a warmish place (about 21ºC apparently). Now take a well earned rest until the dough has doubled in size (about an hour and a half).
- Remove the dough from the bowl and flatten it (I've been told to be gentle with the dough at this stage, I failed). Now you can either roll it up and fold the sides in, making a nice roll, or you can follow a more complicated route, detailed here.
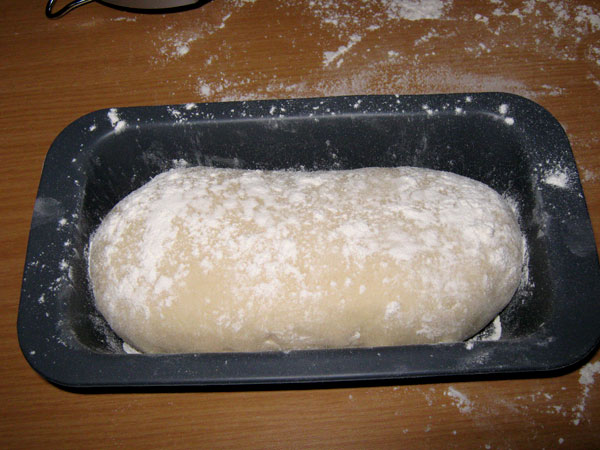
- Place your roll in a bread pan (seam side down) and sprinkle with flour, like so:
- Cover with a damp cloth and leave to rise until it's once again doubled it's size, took about another hour and a half.
- Bake in a 190ºC oven for 35 minutes.
- Turn out on a baking tray (I don't own one of these) and let it cool down for about 40 minutes before cutting (yeah right).

Don't worry sprout, soon you will grow big!

Almost there!


Yes, I know it has bubbles. :/

Yum!
Thursday, May 13, 2010
Good and Evil Hat (Commission)

This hat was done as a commission for someone at work. Charged waaay too little for it. :/
It's pretty much exactly the same as my purple one, only in a different colour and he tweaked the design slightly.

As you can see, this one's fully reversible, as he opted not to have a pompom on the top.
Saturday, May 8, 2010
Super Mario Hat Pattern
I saw a few of you requesting the pattern for my Super Mario hat below. However I didn't check my blog much and then I forgot to reply and then I couldn't find the pattern and then it became too late to reply anymore. Yes, I fail at the internets.
But now I've located the pattern in the deep, dark recesses of my computer. So for anyone who's still interested, here it is.

But now I've located the pattern in the deep, dark recesses of my computer. So for anyone who's still interested, here it is.

Tuesday, September 1, 2009
Super Mario (double knit ear flap) Hat

Well I completed the second hat at last. This one is loosely based on the Skull one.
Changes that were made from that pattern:
a) I knit-purled my double knit, so the inside is an inverse of the outside.
b) I cast on 92 stitches instead of 108 to make it slightly tighter.
c) As you can see from the photos below, the back has been knit longer than the front. I did this by first connecting the two ear flaps and knitting about an inch on straight needles before casting on the front and joining it in the round.
d) Inconsequential, but the ear flaps are also an inch longer than the purple hats'.
e) Obviously I changed the design from Skull to Super Mario (if anyone's really interested and wants the chart, I can mail it to them).
Edit: Seems there were actually people interested in the pattern. So here you go:


Wednesday, August 26, 2009
Of Purling and Loose Stitches
So I was working on my second hat, which is similar to the first one except, this time I wasn't so lazy about purling and decided to do a proper knit/purl double knit (mostly cause the hat is for someone else).
Unfortunately I very quickly noticed that my purling is a -lot- looser than my knitting, which means that the "inside hat" is bigger than the outside and bunches up. This may not be such a big issue in a hat, but it pretty much rules out ever trying to knit two socks at the same time. I'm not even sure whether this is because I hold my purling yarn on my middle finger (as opposed to my index) or whether my purling is just naturally looser or if it's a combination of the two.
So I went to my good friend Google to try and find a solution and found some mention that the Combination Purl Stitch is tighter. In a nutshell, this involves wrapping the yarn clockwise around the needle instead of counter-clockwise (ie. from the bottom up). On the next row you then have to purl into the back of those stitches (it's -much- easier than purling into the back of a normal stitch, promise).
The photo below is of the inside of the hat (ie. the purl side) and you can (hopefully) see the stitches tightening up around the middle of the mushroom's "hat".
Hope this can help someone.

Unfortunately I very quickly noticed that my purling is a -lot- looser than my knitting, which means that the "inside hat" is bigger than the outside and bunches up. This may not be such a big issue in a hat, but it pretty much rules out ever trying to knit two socks at the same time. I'm not even sure whether this is because I hold my purling yarn on my middle finger (as opposed to my index) or whether my purling is just naturally looser or if it's a combination of the two.
So I went to my good friend Google to try and find a solution and found some mention that the Combination Purl Stitch is tighter. In a nutshell, this involves wrapping the yarn clockwise around the needle instead of counter-clockwise (ie. from the bottom up). On the next row you then have to purl into the back of those stitches (it's -much- easier than purling into the back of a normal stitch, promise).
The photo below is of the inside of the hat (ie. the purl side) and you can (hopefully) see the stitches tightening up around the middle of the mushroom's "hat".
Hope this can help someone.

Sunday, August 16, 2009
Double Knit Snowboarding Hat with Earflaps

For those of you not interested in my rambling, just scroll down to the pattern at the bottom (not that I think anyone will be able to actually follow it).
Having never attempted circular knitting or two colour knitting before, I decided to figure them both out at the same time. (My logic is infallible, shush.)
Initially the pattern I decided on, was this one:
Knit Ear Flap Hat Pattern
Things were progressing fairly well (once I managed to actually find a shop that sells circular needles less than 30" in length), mostly thanks to this knittinghelp.com (awesome site), as you can see below:
 However, those of you who have any experience with Fair Isle knitting, should know that the inside is just awful. Loose strands everywhere! Especially in a hat, where you have to take into account that it will have to be able to stretch to fit on a head, well it wasn't working for me.
I then remembered seeing something about double knitting on the site mentioned above, and seeing as I was planning on knitting a lining for the hat anyway, it was perfect. After looking around, I came across an article on knitty.com, which saved my hat. On knittinghelp.com, she shows you a few methods on how to hold the yarn while double knitting. Being a British knitter myself, I couldn't figure out Continental knitting and eventually ended up holding both yarns in my right hand, one on the index finger and the other on the middle.
Seeing as I was redoing the hat anyway, I figured I might as well make my own design.
Now then, for the important part.
Yarn Used:
50g of Double Knit in Purple
50g of Double Knit in White
Equipment:
4mm Circular Needle (16")
4mm Double Pointed Needles
4mm Crochet Hook
Stitch Marker (I used one of my rings)
Cardboard (for the pom pom)
Gauge:
4" x 4" = 23st x 34 rows
Size:
19" circumference. I read somewhere that you should measure the head it's for and subtract 2" for a beanie.
Abbreviations:
dpns - double pointed needles
mc - main colour (purple)
cc - c...c... other colour
k1 - knit 1
p1 - purl 1
m1 - make 1
k2tog - knit 2 together (note here, that because this is double knitting, you'll have to use another needle to swap two stitches around, so you end up with MC, MC, CC, CC instead of MC, CC, MC, CC, before knitting them together.)
Important Note:
Usually with double knit patterns, I've noticed that they tend to treat it like a single knit pattern and just assume that the knitter will know to do the opposite in the other colour. I didn't feel like doing that, which may or may not be confusing to some. Generally, all you have to remember to do is just move the yarn of the colour that's in front back and forth (unless you're K1 P1-ing, as opposed to my K1 K1-ing, in which case, move both yarns back and forth).
Earflaps:
Using the dpns, cast on 9 stitches in MC, I used Backward Loop Cast On, I would advise against using Long Tail Cast On in this case as it already "knits" one row for you, which messes up the double knitting.
Note: To keep the two layers together, twist the MC and CC yarns at the beginning of each row, anti-clockwise.
Row 1: K1 MC, *(K1 CC, K1 MC), repeat from * 4 times. (You can also K1 MC, P1 CC, which will make the hat reversible, but I was being lazy and didn't feel like purling.)
Row 2 (and every even row): P1 MC, *(P1 CC, P1 MC), repeat from * until end of the row.
Row 3: K1 MC, K1 CC, M1 MC, M1 CC, *(K1 MC, K1 CC) repeat from * 3 times, M1 MC, M1 CC, K1 MC (7 MC and 6 CC total)
Row 5: K1 MC, K1 CC, M1 MC, M1 CC, *(K1 MC, K1 CC) repeat from * 5 times, M1 MC, M1 CC, K1 MC (9 MC and 8 CC total)
Row 7: K1 MC, K1 CC, M1 MC, M1 CC, *(K1 MC, K1 CC) repeat from * 7 times, M1 MC, M1 CC, K1 MC (11 MC and 10 CC total)
Row 9: K1 MC, K1 CC, M1 MC, M1 CC, *(K1 MC, K1 CC) repeat from * 9 times, M1 MC, M1 CC, K1 MC (13 MC and 12 CC total)
Repeat until:
Row 21: K1 MC, K1 CC, M1 MC, M1 CC, *(K1 MC, K1 CC) repeat from * 21 times, M1 MC, M1 CC, K1 MC (25 MC and 24 CC total)
Row 22: P1 MC, *(P1 CC, P1 MC), repeat from * until end of the row.
Row 23: Slip 1 MC (purl-wise), *(K1 CC, Slip 1 MC), repeat from * until end.
Break yarn. Repeat for other earflap.
Pattern:

Hat:
With your circular needle and MC, cast on
Turn and K1 MC, *(Slip 1 CC, K1 MC) across the stitches of the one earflap.
Cast on
Turn and K1 MC, *(Slip 1 CC, K1 MC) across the stitches of the other earflap.
Cast on
Join the work, placing a stitch marker between the first and last stitch.
(108 MC sts + 108 CC sts = 216 Total)
EDIT! Thanks to Sue and Becky for pointing out my complete failure at basic addition.
NOTE: With regards to the slipping of stitches here, be sure never to knit CC into MC stitches or vica versa (until you get to the pattern of course). The only reason why I'm slipping here is because I'm only casting on with purple and I don't want to knit through my white stitches with the purple, so I'm ending the earflaps with one more row of white, so I can slip the white while casting on the purple brim.
Row 1&2: *(K1 MC, K1 CC), repeat from * for entire row.
Row 3-32: Follow the pattern shown above (feel free to make up your own pattern, keeping in mind that 108 should be divisible by it's width and try to keep it around 30 rows high.) For alternative colour stitches, just K1 CC, K1 MC instead of the usual K1 MC, K1 CC.
Continue with *(K1 MC, K1 CC) rows until the hat measures about 4.5" from the brim (alternatively, until it fits in such a way that only your crown is still open).

Start the decrease!
You will have to switch from the circular needle to the double pointed needles when it starts getting too small for the circular needle. I think I switched at around row 11 or 13.
Row 1: [K2Tog MC, K2Tog CC, *(K1 MC, K1 CC) repeat from * 10 times] repeat entire bracket until end of row.
Row 2 (and all even rows): *(K1 MC, K1 CC), repeat from * for entire row.
Row 3: [K2Tog MC, K2Tog CC, *(K1 MC, K1 CC) repeat from * 9 times] repeat entire bracket until end of row.
Row 5: [K2Tog MC, K2Tog CC, *(K1 MC, K1 CC) repeat from * 8 times] repeat entire bracket until end of row.
Row 7: [K2Tog MC, K2Tog CC, *(K1 MC, K1 CC) repeat from * 7 times] repeat entire bracket until end of row.
Row 9: [K2Tog MC, K2Tog CC, *(K1 MC, K1 CC) repeat from * 6 times] repeat entire bracket until end of row.
Row 11: [K2Tog MC, K2Tog CC, *(K1 MC, K1 CC) repeat from * 5 times] repeat entire bracket until end of row.
Row 13: [K2Tog MC, K2Tog CC, *(K1 MC, K1 CC) repeat from * 4 times] repeat entire bracket until end of row.
Row 15: [K2Tog MC, K2Tog CC, *(K1 MC, K1 CC) repeat from * 3 times] repeat entire bracket until end of row.
Row 17: [K2Tog MC, K2Tog CC, *(K1 MC, K1 CC) repeat from * 2 times] repeat entire bracket until end of row.
Row 19: [K2Tog MC, K2Tog CC, *(K1 MC, K1 CC) repeat from * 1 times] repeat entire bracket until end of row.
Row 21: [K2Tog MC, K2Tog CC] repeat entire bracket until end of row.
You should have 9 MC and 9 CC sts left. Break yarns and weave the tails through remaining respective stitches (ie. MC through MC, CC through CC); draw up firmly, secure on wrong side.
Finishing:
With the right side facing and the crochet hook, using MC, attach the wool center back and single crochet all around the endges including the earflaps. Take care to keep the work flap (ie. don't crochet too tightly). Join with a slip stitch in first single crochet. Fasten off.
Cut nine 30” strands of MC and draw through stitches at point of a earflap to the mid-point of the strands. Divide the lengths into 3 sections of 6 strands each and braid them. Knot the end of the braid. Trim ends even. Repeat for the other earflap.
Using the cardboard, cut out two donut shapes in the size you want your pom pom and make a pom pom in CC. (For more detailed instructions on how to do this, Google is your friend.) Attach pom to the top of your hat.
Feel proud and take moronic photos of yourself wearing it.

Monday, July 6, 2009
Marble Butter Cupcakes

So we come to the reason for this blog's existence and as you may have guessed from the name... it is cupcakes. Specific cupcakes.
The other Sunday the baking bug bit me again and I decided on cupcakes. I had used my gran's secret recipe prior, which is similar to "Angel food cake" I think, in that it's made mostly by beating the hell out of some eggs and then adding a whiff of other ingredients. This time I felt like something more substantial (and less complicated) and decided to try the Butter Cake recipe in my ancient "Kook en Geniet".
They came out pure awesomeness, if I do say myself.
Butter Cake
125g Butter/Margerine
375ml Sugar
5ml Vanilla Essence
3 Eggs
625ml Flour
20ml Baking Powder
2.5ml Salt
200ml Milk
- Beat the butter and gradually add the sugar. Beat until light and creamy. Add the vanilla essence.
- Add the eggs one for one and beat very well after each addition.
- Sift the flour, salt and baking powder together and gradually add it and the milk to the butter mixture, alternating between the two. Beat until everything's mixed well and it has a velvety appearance (hey, that's what the book says). Don't stir, beat, cause you're trying to get air in, not out.
- Fill cupcake cups to about... half to two thirds full.
- Bake for 15-20 min at 180C (350F). If you stick a toothpick into one, it should come out clean.

I however, decided to get a bit creative and before putting them into the oven, I swirled some food colouring into each with a toothpick. While this looked absolutely awesome when they came out, unfortunately the colouring doesn't go deep enough into the batter (or I didn't get it deep enough anyway). This meant that the marble effect was mostly covered by the icing.

For the icing I simply beat some butter and then gradually added icing sugar until it tasted like I wanted it to.
They were meant to be blue and pink, however, the local supermarket was inconsiderate enough not to have blue food colouring (the nerve!).
On a final note, I'll definitely use this recipe again. The only downside I can see to it is the extreme detriment it could have to one's weight.
Subscribe to:
Posts (Atom)