Tuesday, December 21, 2010

First Pottery Pieces

So I recently started doing pottery on a weekly basis. It's super fun, except for the part where I have to keep my nails short :(

The title is technically a lie. My -first- pottery pieces were a coiled cereal bowl, which sadly cracked in the kiln and consequently can now only serve as a peanut bowl that looks like it was made a five year old. And then of course, the famous, Ugliest Sugar Bowl IN THE WORLD. It's a pinch pot... but yes, not exactly something I want to show off.

Right, so moving on.

The teacup below was my first thrown object, the saucer my second. As you can see from the size of the saucer, I got a very quick lesson in "clay shrinks". They're made from terracotta earthenware, the inside is glazed in black and outside in... something shiny.

Unfortunately the kiln apparently hates me and decided to drop some fluffy insulation stuff on my cup while it glazing, causing the bubbling etc you can see on the photos.

Teacup:


Saucer:


Saucer Bottom:


And then this is my latest attempt.

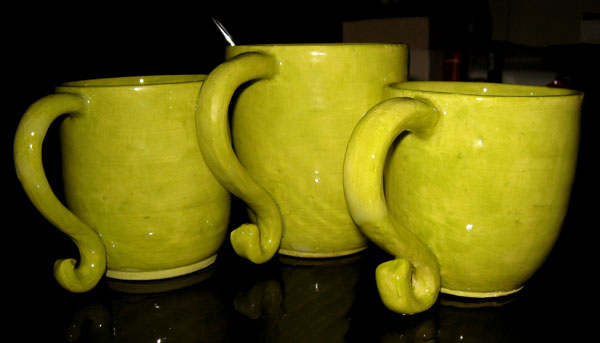
Contrary to what you may believe, these are a set. See? They're the same colour. And yes, I did weigh the clay before I made them. Somehow I still managed to make three completely dissimilar mugs. Oh well.

Wednesday, December 15, 2010

To Do List

I've currently got so many projects up in the air that I'm not actually getting to any of them. So I figure I'd put them here where I can't lose the list.

So as it stands as of today:

  1. Complete the apron and chef hat (to be done before Christmas)

    Shhh, secret.


  2. Complete all my Christmas stockings (to be done before Christmas)

    They're not really "stockings" per se. I'd originally planned to buy lots of little presents, but that ended up too expensive and if you don't have lots of little presents in the stocking then the "toe" part becomes a bit awkward. Thus they're more like pseudo stocking bags.


  3. Finish knitting the Branching Out Scarf by Susan Pierce Lawrence for a Craftster Challenge (to be done before 7th of Jan, haha)

    Well this is turning out to be a frustrating project. It's not that the lacing is hard, it's just that if you drop a stitch, you're pretty much screwed and have to start over.


  4. Finish the last cupcake pincushion.

    I'm still trying to figure out a way to get the "cup" right.


  5. Complete my apron, to replace the one ruined by the maid.

    She washed my white hand made apron with my jeans :(


  6. Complete my Lickle Bear cross-stitch. (Almost done!)

    I really shouldn't admit outloud that this isn't finished yet.


  7. Make a knitting bag.

    I've bought the ingredients for this, but I'm planning on using my cross-stitch to make the bag, so I need to finish that first.


  8. Make a new duvet cover and pillow covers and redecorate my bedroom.

    A bit tired of my room, thought about redoing it in white and lime with black embroidered cat designs on it. Also swirls... it'll look more awesome than it sounds, promise.


  9. Make inchies!

    I just saw them on Craftster they look like so much fun!


  10. Finish knitting the sweater.

    Possibly three years from now.


  11. Learn to make soap!

    On condition I find the ingredients to do this with.

Saturday, August 28, 2010

Cupcake Pincushion

Cupcake Pincushion

After seeing the adorable Cupcake Pincushions by Kylie my immediate reaction was, "I want one."

Carefully following her directions, I came to the conclusion that my city sucks when it comes to craft supplies and consequently a lot of deviation and improvisation was required.

Firstly, the only styrofoam balls I could find were either too big or too small, so eventually I went and bought some sponges, like old school bath sponges, the flat cylindrical ones and just sewed the ends in until it formed a ball.

Then I couldn't find a cup that was the right size and eventually I constructed one from cardboard. According to my boyfriend, this cardboard cup was the most homemade thing he'd ever seen (and he didn't mean it as a compliment).

In the end however, it came out better than I expected. For my next one, I'll make the cup diameter smaller and I'll make my first icing wobble a bit bigger, but overall I'm quite happy with it.

Saturday, June 26, 2010

White Sandwich Bread

Bread. As more of a "cake" type person, bread is something I've always wanted to try but have only ever attempted once, with sadly disastrous results. If I recall correctly it tasted both completely tasteless and strongly of yeast, at the same time. A feat, I'm sure.

However, a few years have passed and I have recovered enough from my abject failure to attempt it once more.

After long and arduous research, I came across a recipe that appeared to have merit, namely:
Susan's Easy Basic White Sandwich Bread Recipe

White Sandwich Bread

It ended up making a really delicious white bread. It's denser than store bought bread and more filling (and will probably not keep as long, due to a lack of preservatives) but also really, really good.

I cut the recipe in three, halved the yeast, couldn't find any bread flour and didn't have any Canola oil so here's how I did it.

Ingredients:
3 1/3 cups (825ml) Flour
1 tsp (5ml) Instant Yeast
2 tsp (10ml) Sugar
2 tsp (10ml) Butter / Margarine
1 1/3 cups (325ml) Milk
1/2 tbsp (7.5ml) Salt

  1. Mix 1 1/3 cups (325ml) of flour, the yeast and the sugar together.
  2. Heat the milk and butter / margarine until the butter melts and then let it cool until only slightly warm.
  3. Make a hole in the flour mixture and pour the buttermilk into it, mixing vigourously. (Yay for lumps)
  4. Now gradually add the rest of the flour, mixing as you go. It should stop sticking to your fingers by the time you're done.
  5. Knead the dough for about 6 to 7 minutes. (My poor weak arms :( )
  6. Cover the dough and rest your arms for 20 minutes (while the dough autolyses or something)
  7. Now flatten the dough, sprinkle half the salt on it. Fold it a few times, flatten again and sprinkle the rest of the salt on it.
  8. Back to kneading! Take your frustrations out on it for another 5 to 7 minutes.
  9. Put back in the bowl, sprinkle some flour on it, cover and put in a warmish place (about 21ºC apparently). Now take a well earned rest until the dough has doubled in size (about an hour and a half).


  10. Don't worry sprout, soon you will grow big!


    Almost there!

  11. Remove the dough from the bowl and flatten it (I've been told to be gentle with the dough at this stage, I failed). Now you can either roll it up and fold the sides in, making a nice roll, or you can follow a more complicated route, detailed here.
  12. Place your roll in a bread pan (seam side down) and sprinkle with flour, like so:


  13. Cover with a damp cloth and leave to rise until it's once again doubled it's size, took about another hour and a half.


  14. Bake in a 190ºC oven for 35 minutes.


  15. Yes, I know it has bubbles. :/

  16. Turn out on a baking tray (I don't own one of these) and let it cool down for about 40 minutes before cutting (yeah right).


Yum!

Thursday, May 13, 2010

Good and Evil Hat (Commission)


This hat was done as a commission for someone at work. Charged waaay too little for it. :/

It's pretty much exactly the same as my purple one, only in a different colour and he tweaked the design slightly.


As you can see, this one's fully reversible, as he opted not to have a pompom on the top.

Saturday, May 8, 2010

Super Mario Hat Pattern

I saw a few of you requesting the pattern for my Super Mario hat below. However I didn't check my blog much and then I forgot to reply and then I couldn't find the pattern and then it became too late to reply anymore. Yes, I fail at the internets.

But now I've located the pattern in the deep, dark recesses of my computer. So for anyone who's still interested, here it is.